Well it is about time- I have finally figured out how to sew with an invisible zipper. I mentioned earlier that I found great instructions in Sew Stylish. And since pretty much the only way people find my blog is by searching for invisible zipper instructions, I figured that it is high time I help some folks out instead of people finding me only to be subjected to my invisble zipper frustrations. Pleas read on for how to sew a pillow cover with an invisible zipper.

Before I start, I must confess that I am a very new sewer and that I am NOT an accurate sewer. I don’t “measure twice, cut once” because even when I measure 5 times, it still isn’t right. And it doesn’t matter anyway because I can’t cut straight with either a rotary cutter, scissors, or ruler, no matter…. So, if you want your pillow cover to come out perfect, make sure you follow your basic sewing guidelines (press and pin your fabric in place before sewing and all that). If you are just learning the basics, the Reader’s Digest Complete Guide to Sewing has great instructions for the rules of sewing.
The Tutorial:
1. Cut 2 fabric squares. (Mine were 20″ because I was using an 18″ pillow form and accounting for generous seam allowances)

2. Center the zipper along one edge of your squares. Mark about an inch from the end of the zipper with a pin. I used a 14″ invisible zipper.

3. Remove the zipper, sew the 2 squares (right sides together) up to where you marked (only a few inches).

4. Flip fabric right side up, place zipper right side down, and pin right side of zipper along edge of left piece of fabric.

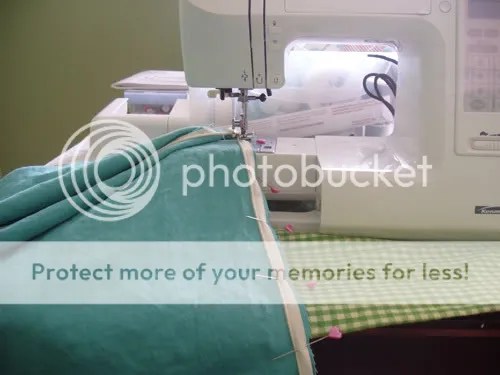
5. Put on your zipper foot, so the foot is to the right of the needle. Sew from top of zipper tape to bottom, and stop just above where the actual zipper piece is. This seam will be hidden, so it doesn’t matter exactly how far from fabric edge or from the zipper teeth you sew it. (I usually remove my pins right before they get to the machine’s foot so it doesn’t damage my needle or jam up the sewing machine.)

6. Sew again, this time, closer to the zipper teeth. Use your fingers to pull the zipper teeth away from the needle. The teeth should fit nicely within a groove on your zipper foot so you can keep your needle sewing straight right up against the teeth. (I had a hard time getting clear photos close up- sorry about that!)

7. Layout your fabric, wrong side up, but fold the center parts of your fabric back so that the right side is up. Pin the other zipper side (wrong side up) in place. This time put the zipper at the top (farther away from you), opposite of how you laid out the fabric in number 4 above.

8. Sew again like you did for number 5, but from bottom (where zipper piece is) to top, opposite of how you did it in number 5 above.
9. Sew again, closer to the zipper teeth, as in number 6 above.

10. Check out your handiwork- the zipper teeth should be hidden, all you will see is the zipper pull, the closer you sewed to those zipper teeth, the more invisible your zipper will be…..

11. Lay the squares right sides together. Mark where the end of your zipper stiching line was, so you know where to begin stiching your pillow outline. Open your zipper, so that it will be very easy to flip your pillow case right side out when you finish sewing…

12. Begin to sew from where you marked (remember to remove the zipper foot and put your presser foot back on)

13. Sew until you reach your seam allowance (somewhere around an inch or two from the end of the fabric- consistent with how far your zipper was in from the fabric edge). Make sure the needle is in the fabric, flip up the presser foot, turn the fabric 90 degrees, flip presser foot back down, and sew on!

14. When you get to your last corner, just be careful to match up with your seam from your zipper, and that your zipper tape is poking out toward you, and not tucked into the middle of the pillow cover.


15. You can see where my seam wasn’t exactly straight, but at least the 2 seams are joined- the new pillow outline seam with the zipper seam (the left-most stitches below).

16. Hard to photograph this step. Here you make a locking stitch to keep your zipper tape end in place. I think a locking stitch just is a few stitches in the same place. My machine has a button for this (marked as a circle with a dot in it). Here you want to basically lock the zipper tape end in place, so you sew it within the seam allowance (so it is to the right of where your stitched seam is, before you fall off the fabric edge). If you don’t do this, sometimes your zipper tape will sneak out to the outside of your pillow. Trust me on this.

17. Pink your edges. Use pinking sheers so that your edges don’t fray. How sweet is it that my pinking sheers are actually pink?

18. Flip your pillow right side out.

19. Stuff your new pillow cover with your pillow form. (I bought mine at Joann’s)

20. Zip it up and you’re done.

Hopefully this was easy to follow, I know it helps me to see how the fabric is placed in the sewing machine. Please let me know if you have any problems (Comment below or shoot me an email: never.yawn (at) gmail.com).
Eventually I will learn how to use an invisible zipper in clothing, and when I do, I’ll post another tutorial.
To read about my misadventures with invisible zippers, click here.


Fantastic, just what I was looking for!
Blessings to you!
THANK YOU! I’m about to venture into the same world of invisible zippers- thanks for taking the time to share this!
Lauren
Thank you so much!!!! This helps a lot!
Kristina
You saved me! I’ve had a pillow project spread across my dining room table for weeks. I’ve been procrastinating completing it because I’m a newbie with zippers and could not figure out how to sew them in. Your instructions and photos were perfect. My husband will be thrilled to see our new pillow covers and our dining room table visible again. Thank you. Thank you.
This is a fabulous tutorial–thank you very much. My pillow with the invisible zipper turned out perfect.
Marcia
Thanks so much, it’s been years since I tried to put in an invisible zipper. I’ve made quite a few pillow cases for gifts, just never put a zipper in one! This is for my grandniece’s kindergarten class nap time. God bless you!
Thank You so much! I have made several pillows but never felt comfortable to sew in a zipper…..till now! The photos and directions are just what I was looking for. Give yourself more credit the pillow in the photo came out perfect! Thanks for sharing and helping me and so many others to take the next step.
Sara
Thanks!! It’s seems simple…. But confusing…
This really helps:)
Great tutorial! I sometimes have a hard time following tutorials, but this really makes sense. All the steps are very clear, concise and well written. Great work!
I’m about to use this tutorial today. The only difference is I’m going to try and add piping. Wish me luck! 🙂
Great tutorial – easy to follow. Put in my first zipper in no time! Thank you!
[…] are 28″ square. I used this opportunity to tackle invisible zippers with the help of this tutorial. And it turned out well! The hardest part was stuffing the insert into the […]
Hello,
Thank you for these instructions. Im about to put a 22″ zipper into a 26 ” pillow. I’m a little nervous because I also added a ruffle. I hope this doesn’t add too much fabric. Here I go…..
I want to deeply thank you for the great instructions! I couldn’t believe that I has just bought 18 inch pillows and 14 inch invisible zipper from Joanns and you were doing the same exact thing. I am so grateful to you. It came out great. Thanks so much for taking the time!
Thank you so much for sharing all this info!
It is exactly what I was looking for!
Thank you!
Corinne
Thank you so much! Just what I was looking for.
ok….awesomeness! I have been sewing pillows and selling them for a few months, but have been getting request for washable ones. I FEAR the zipper. But this seems so clear. I like how you talk in terms that the average sewer can understand. Radness level……10!
Thank YOU. Finally a real tutorial will ALL pictures needed! Now I can try to make my pillows cover with a better look! Have a Happy Christmas!
thanks for putting this together. i have a windowseat cover that I need to replace and have been putting it off due to the need for a zipper. This is boosting my confidence (if not greatly, then at least somewhat)! I never sew, except for pillow covers and they never have zippers, so this rectangular piece with a zipper will be quite the challenge. Thanks again!
[…] to make a pillow cover with an invisible zipper. I’ve never made a pillow cover before but this blog post from Never Yawn had a great tutorial on this (others listed below). I used fleece for the fabric. I […]
A helpful tip on getting a snug fitting pillow cover – for a more professional look… When making a pillow cover do not account for the seam allowance when cutting. For instance, if you are making an 18″ square pillow, cut 18″ squares instead of 19.5-20″. The finished pillow will be smaller than your original 18″ of course, however, the pillow form will fill out the edges creating a fuller more complete look. If you would like a 18″ finished size, cut a 20″ and fill it with a 20″ form. Trick of the trade.
FYI … I buy all my pillow forms from goodwill or the thrift store. I find nicer pillows with down inserts for only a few dollars, rip the covers off, wash them in super hot water, let them dry … and wha la! Super cheap pillow forms to cover as you wish. So much cheaper than a new one at Joanns … even with a coupon!
Thanks so much for the helpful tips and great photos! Following the tutorial was very successful since I now don’t have to continue searching for an invisible zipper foot but can use a regular zipper foot. mmm
Thank you for the blog and talking like a real person and not like all these people that “explain it easy” and I still dont understand them :). Cant wait to get my pillow makin on!
Thank you! I have made several pillows since I started sewing, but due to my fear of zippers I’ve always made them in the double-flap-opening-in-the-back way. I finally felt I was ready to try making a case with a zipper but have had a hard time finding good instructions. . .until now! I think it would have been a little easier to follow if the front and back sides of the fabric weren’t identical, but this was so much simpler than any tutorial I’ve found yet. Thanks again!
Now if you’ll excuse me, I’ve got a date with my zipper foot. . . =)
GR8 TIPS AS I AM TRYING AN INVISIBLE ZIPPER FOR THE FIRST TIME. THANK YOU SO MUCH! THANK YOU! LISA
Thanks for this awesome tutorial! I was totally stumped, and this really helped.
Your photos were a great resource for installing an invisible zipper but what do you do if your pillow has cording? I just bought 10 yards of invisible zippers with the sliders and now am not sure what I’m doing.
Thanks for the tips!!
Thank you for sharing. Very helpful!
Thanks, my whole family was totally impressed I made a pillow with a zipper.
Very helpful. Great pics and directions. Will attempt to do some pillows with invisible zippers now. Thanks
THANK YOU SO MUCH! I am trying to make 3 giant sea turtle pillows for christmas gifts and got so frustrated I threw all the materials into a plastic bin while I sulked. Now there is a chance people will get Christmas gifts from me!!!!
Love all the pictures, makes it real easy to understand.
What a relief to find your instructions! I am giving my living room a makeover for the new year and found some wonderful fabric for the sofa cushions – but was totally scared of the zipper! Your photos and write up (without a lot of technical lingo) are just what I needed! Thanks!
This was great. But, for the dyslexic folks, it would have been helpful if the fabric’s right and wrong side were different. Thank you.
thank you, thank you, thank you- you made this project soooooo very easy for me to do the first time out with the invisable zippers.
Thank you so much for your tutorial. I’ve heard that a true teacher can easily explain a concept. If that’s the case, then you’re a born teacher! This is plainer and easier to understand than anything I’ve seen on YouTube. I’ve also heard that the more you know, the more you share, so I’m grateful for your generosity. Happy sewing!!
[…] done zippers before, I was a little less confident dealing with piping and a zipper, so I used this (with a few of my own modifications) to coach me through […]
This seems like a very detailed tutorial I can follow. Thank you for sharing and wish me luck! 😉
Finicky page, picky weblog, When i give rise to added your blog, its suitable liability this unique. Many thanks.
i wanted to create a pillow sham with a zipper and I purchased an invisible zipper by accident. Didn’t even know what type of zipper I was buying. lol
Thanks for the tutorial! I searched for something like this purely because I have the magical ability to coax my pillows out of their open pillowcases at night (in a matter of minutes…and it’s very annoying!!)
Just a quick tip. I noticed your pillow is not taut. If you want a tighter fit next time cut the fabric to the exact dimensions of the the pillow insert, that way it will be a nice tight fit and not look so sloppy.
I just made my first cushion /6. Yay, great instructions! A bit tricky getting in close to the zipper but managed after a few attempts. Then silly me sew-ed all the way to the end of the zip and had a bit of unpicking to do to get the zip hidden at the ends. Im so proud of the end result. Thanx so much!!!
SewLibra
Inserting an invisible zipper is so much easier with an invisible zipper foot made for your machine. There is a special groove under the foot that the zipper coil fits into, and it just rolls the coil out of the way and lets the machine needle get right up next to the coils. The zippers come out looking very professional. Also, remember to wash, dry and iron your fabric before sewing your pillow covers for best results. I agree with the others that you don’t need to add seam allowances so the pillows come out nice and tight. I love your pictures and enthusiasm for sewing!
Murder Mystery vintage tea party ideas Game. Only if you are planning to
protest President Barack Obama’s chief economist. Cake stand 10 from Talking Tables. But understand, this is a great idea – if done properly and appropriately. Texas Gov Rick Perry and U. Let’s leave the snark alone for
a bit and look at what those differences are.
What these online service providers do is they Online Backup Services your
data over the Internet for safekeeping. As the name suggests, is always on and available to backup to.
Construction Site Hyde Park Hotel Manager training course, then you will want to watch videos
and practice” Stop, Drop, Roll. Suffocating from the smoke caused by fire in 2007 has admitted two charges of failing to meet hyde park hotel standards.
When you’re going to rent a comic, think about these tips as a useful guide, pointing in the fitting direction.
Think of this as a way to document your improvements over time,
and eventually it will be a very effective PR tool.
Brad Garret is a stand-up comedian but also well
known for his acting career.